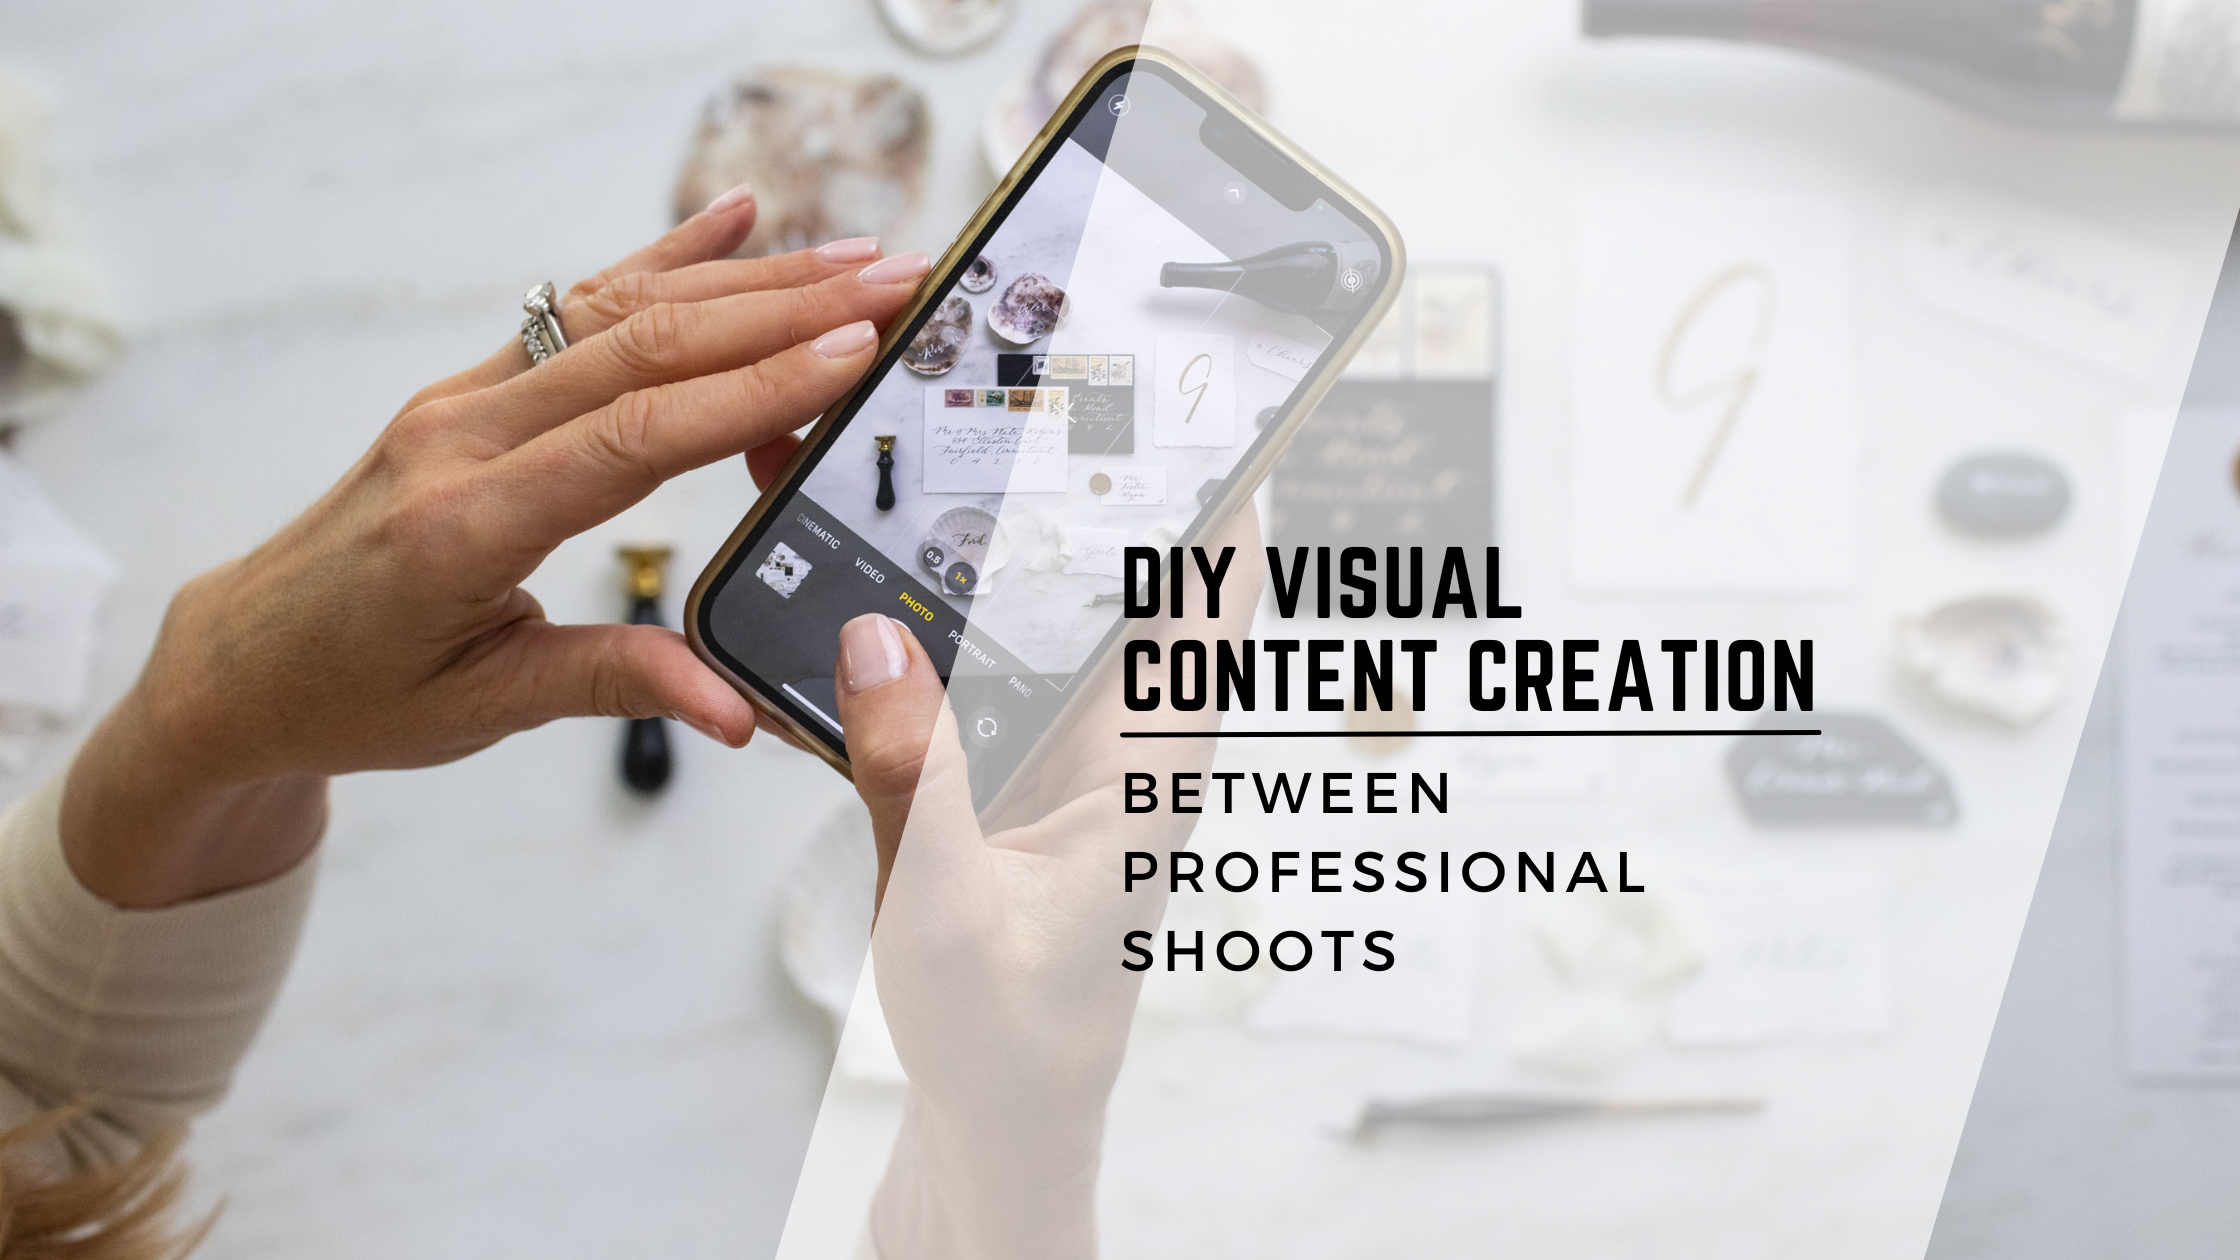


In a perfect world, you’d have a dedicated brand photographer or videographer on hand, following you around – reality TV-style – capturing every moment in your creative business. Afterall, it can feel impossible to single-handedly keep up the high demand for seemingly constant social media content.
But for most creative entrepreneurs, hiring a full-time photographer is just not in the cards or your budget – plus it’s not very practical!
Sure, you might have some stellar shots or behind-the-scenes footage from professional sessions, but what about the in-between moments? Those instances when you’re itching to showcase a new skill or shout from the rooftops about a seasonal offer?
Afterall–the only constant is CHANGE when it comes to running a business!
So, how do you keep your visual content engaging and on-brand between those professional sessions?
I’ve got you covered!
In fact, I’ve created a FREE 8-page guide (I hold nothing back) and a 23 minute, deep-dive YouTube Tutorial to guide you through the process whether you’re brand new to DIYing your content or ready to level-up your videos!
I know you didn’t sign on to become a professional photographer or content creator– but creating and sharing compelling content is the price of admission these days! Luckily, there are simple ways to skillfully capture compelling content while you’re knee-deep in the hustle of your business.
ABC (Always Be Capturing)
When it comes to snagging captivating content between those professional shoots, have one golden rule:
“Always be capturing!”
I get it, as an entrepreneur your to-do list is probably bursting at the seams, but trust me – approaching content creation strategically and simply can make it less of a hassle than you’d think!
Even in my own business, I live by the ABC principle.
Yes, even us photographers rely on simple iPhone hacks! While I do collaborate with a photographer to keep things fresh and on-brand, I’m constantly snapping behind-the-scenes shots on my trusty phone during shoots. No fancy gear, just the phone’s camera getting the job done!
I capture everything from the setup process to the flow of the shoot itself. It’s all about candid moments that tell a story– the coffee shop where I meet clients, loading up the car for an on-location shoot – those snippets that add character.
Over time, I’ve curated tools and strategies that work like a charm for my business, and I love sharing these gems with my clients, especially fellow creative minds like makers, craftsmen, and artists.
You see, I can’t be in their workspace every day, so I always nudge them to keep capturing their own content.
Why?
Because it keeps the conversation alive, keeping them at the forefront of their audience’s minds.
And now I’m passing these very tips and methods on to you to support you no matter where you are on your content creation journey!
1. First Steps:The Beginner Phase
Early on in your business, it’s hard to step away from the day-to-day operations of your work to focus on your marketing. The mere thought of starting can feel overwhelming. But, with a few simple tricks and an intentional plan, you’ll be on your way.
The first question to ask yourself is:
“What would a potential client, customer, or audience member want to see related to my industry?”
Most of the time, the perfect place to start is with some behind-the-scenes action!
And the best part is, you’re already DOING these things in your business– it’s just a matter of documenting it!
The more you commit to capturing this kind of content, the better you’ll get and the more creative you’ll become as you develop more and more engaging, unique visuals to share with your audience!
Content Type: Time-Lapse
Time-lapse videos are a fantastic way to capture your process and show your audience what you’re up to– there’s so much potential!
You can put yourself in the spotlight by showcasing your workspace setup or workflows without the pressure of talking directly to the camera.
This is HUGE for anyone who is camera shy or gets anxious just thinking about figuring out what to say or do on film! In fact, you don’t have to look at the camera at all!
Time-lapse videos are often candid and offer your audience a sneak peek of your environment. Simply put, it brings people into your world in a really low-lift, authentic, and organic way!
I often find this kind of unpolish, unscripted content is an effective way to build the “know, like, trust” factor with your audience so they really understand the talent, skill, and approach behind the experience, service, or product you provide!
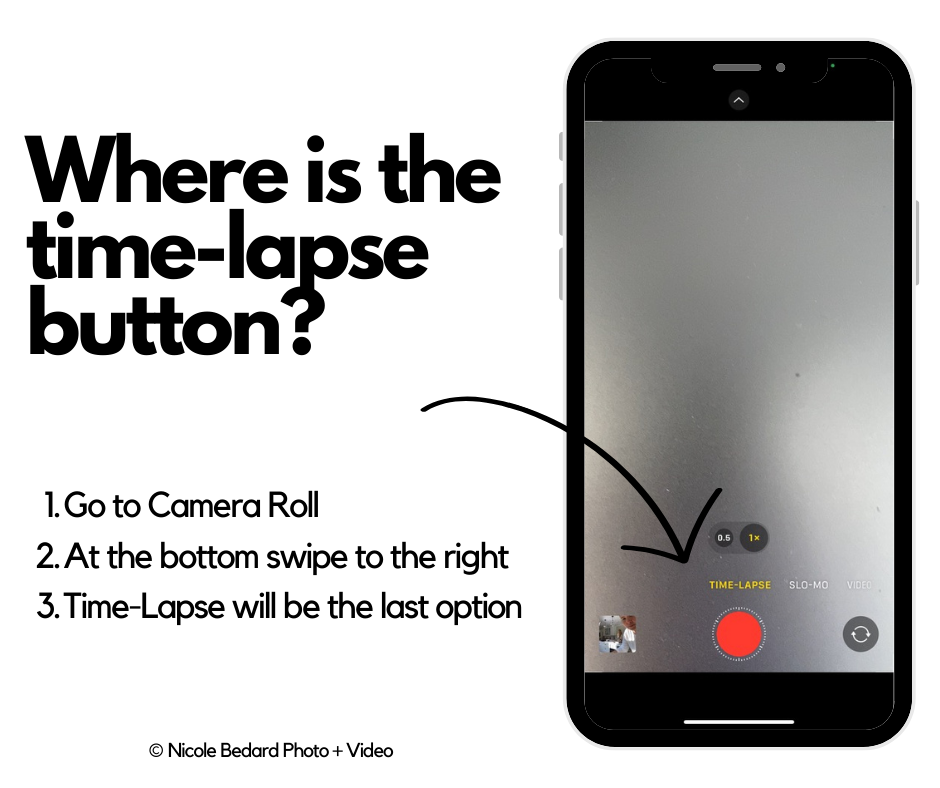
Getting Started With Time-Lapse
So, how do you get started?
The easiest option is to create a time-lapse on your phone.
- Select the time lapse option on your camera.
- Record a few minutes of you doing something related to your business (this will condense into just a few seconds once it’s sped up).
What To Capture
The next big question is, “What should I do during the time lapse video?”
There are so many creative ways to leverage this video format! But my favorite piece of content to create and recommend is the “set-up process” for your creative work.
Your Set-Up
Record yourself setting up your workspace for the work that you’re going to be doing that day. Maybe it’s laying out all of the tools you plan to use on your workbench, taking out your digital drawing pad, opening up your computer to reveal the keyboard you’ll use.
I do this often! Whenever I edit photos for a client, I use the time lapse just to show the movement of the mouse while I’m at work to convey the effort and dedication I have to my craft!
How To Use Your Time-Lapse Video?
So you’ve recorded a time-lapse video.
Now what?
Here are three content ideas you can share with your audience that will reinforce the visual messaging of your time-lapse video.
- Talk about your process or the customer journey. What is it like to work with you? What steps do they need to take to get started? This kind of information helps potential customers understand what to expect when working with you!
- Share timelines. This is a great way to emphasize time-based details like turnaround times, if and when you’re accepting new clients, or how soon they need to reach out to meet their own internal timelines (this helps set realistic expectations and combats the “I want this done yesterday” mindset).
- Spotlight a new project! What are you working on this week? What new project is on the horizon that you are so excited to start planning for? What new technology are you getting ready to implement for the first time? Spark curiosity and build anticipation and excitement! Whether it’s a new project, client, location, or tool– your audience wants to know about it.
Eventually, capturing time-lapse content of you doing your thing behind-the-scenes will become second nature and you’ll be able to establish a sustainable, impactful habit. Pro Tip: Early on, hold off on investing in gear. You don’t need a tripod right away. Instead, think about where you’ll place your phone and how to support it. A stack of books, a box, a bookshelf, or a chair can serve as handy setups. Sure, a tripod makes things easier, allowing flexibility in positioning your phone, but not having one shouldn’t stop you at this stage. In my own work, I’ve found creative alternatives are crucial.
For example. In this specific time-lapse, I wanted the mouse to be the focus at the bottom of the screen while I edited photos for a client. I simply rotated the phone to align the camera lower and capture the desired effect.
Once the video is captured, I have so many content options! I could choose to talk about:
- Editing process information
- Editing turnaround time
- Gear I’m using to edit
- Something new I’m working on
2. Progressing: The Intermediate Stage
As you grow more comfortable capturing content, you’ll start spotting unique opportunities to showcase your business. Sure, you might occasionally kick yourself for missing a moment – but that’s progress!
It means you’re starting to strategize your brand’s marketing approach. Next time, you won’t forget.
Once you’ve found your groove with time lapses and spotting visual opportunities, it’s time to face the camera – quite literally. I get it, speaking to the camera can feel scary, but practice makes it easier. The more you do it, the more natural it becomes, especially when you see the positive outcomes.
I speak from experience. I found it tough to show up on camera in my own business (even knowing how impactful it could be). That’s why in 2020 I committed to showing up on camera more often.
I’ll be honest: video was a tough one for me!
But I kept it simple. I added gear and editing techniques slowly and learned from every one I produced. I steadily started showing up more on Instagram and sharing smaller clips in my stories and posts.
I did it, and that’s why I know you can too!
Content Type: Short Face-To-Camera Videos
So what kind of content should you record?
Short videos, around 15-30 seconds, are gold for social media.
But, what seems quick often takes multiple attempts.
Don’t sweat it!
Getting Started With Short Face-to-Camera Videos
Multiple takes help refine your message. Just avoid chasing perfection. In the early stages, rambling, long-winded explanations, or being overly detailed is common. With practice, you’ll pinpoint the key information for the desired timeframe (such as an Instagram Reels).
Once you nail it, delete the outtakes and move forward!
Done is always better than perfect.
What To Capture
It can be overwhelming to decide what to say once the camera is rolling. Most people find it tough to speak candidly without a plan which can either cause you to ramble or freeze! I like to have a rough script or outline prepared to guide my face-to-camera videos.
Here are some helpful tips to increase confidence, reduce long-winded rants, and stay on topic.
Introductions
You don’t have to introduce yourself on every video you put on social media, but it is important that people know who you are, especially when you’re just starting out! I like to say “Hello, Nicole here!” so that new followers who land on my page know who I am. As you grow, you may cut this out to maximize your time.
For your first few videos you might:
- Start by talking about a current project you’re working on. Highlight the goals of your project and that you can’t wait to share more. Keep it simple and high-level. This is just meant to be a nugget of information your audience can walk away with or inspiration for their own project!
- Give a teaser! If you own a physical or online shop with products, create a video about an upcoming product launch or updated store hours for the holiday season. You can give a tour of your updated website or even a new in-store display!
- Offer a tip related to your industry that your community will find valuable, actionable and helpful! What do your clients constantly ask? What does your ideal audience find confusing or overwhelming? I love to lead with value!
The Set-up
Before you hit record, set the stage! I find the most important things at this intermediate point are solid lighting and perspective.
Natural Light
The quality of your video matters. Make sure you have the best lighting possible.
But don’t worry– you don’t need anything complicated just yet. Natural light gives best results. I encourage my clients to film while looking outside through a glass door or a large window.
Tripods
As you get more confident with face-to-camera videos, you can step up your content game by changing perspectives and introducing varied content ideas. This can be achieved by investing in a tripod.
How To Use Short Videos: Shake it up!
Finally, I encourage you to play with this medium and infuse your creativity! Start to introduce varied content ideas by discussing ongoing projects, giving sneak peeks of upcoming products, or sharing industry tips.
Pro Tip: Embrace Instagram’s voiceover feature! It’s an excellent alternative if facing the camera feels a bit daunting. Consider creating a video showcasing your workspace or your creative process without speaking directly to the camera. Later, layer your voice speaking over the video. Voiceovers serve as a comfortable transition between beginner and intermediate levels, allowing you to ease in without feeling overwhelmed.
3. Advancing: The Expert Level
Once you’re at a more advanced level it isn’t so much about adding new types of visual content as it is leveling up your game. Now that you’ve proven to yourself that you can consistently create and share compelling visual content it’s the time to invest in the right tools for the job.
Production Quality
At the advanced stage, you’re thinking more and more about production quality. You can still use your iPhone camera, but this is where improved lighting and audio can elevate your content.
You may even want to invest in some gear to help make your content creation process smoother and the results more impactful and professional!
LED lights and improved audio gear can dramatically enhance the quality of your videos which is especially important if you’re thinking of adding a YouTube channel or even an online course!Consider these go-to’s from my Amazon Content Creator Starter Kit:
- LED lights (you can mount this to a small tripod with joby phone clip)
- A ring light
- A wireless mic system (I use a lapel vs. clipping it to my clothing)
- A tripod
*Disclaimer: Please note that some of the links included in this blog are affiliate links. This means that if you make a purchase through these links, I may earn a small commission at no extra cost to you.
Pro Tip: Not sure where to start or what gear is right for you? Check out my Top 10 Photography and Video Gear Under $25 here.
Content Ideas for The Advanced Creator
At this point, you’re not just capturing videos but crafting more dynamic reels with a mix of content – time lapses, videos, and photos.
But you’re probably itching to expand your repertoire and explore new content ideas!
Consider creating walkthroughs of your workspace, introduce your team members, and showcase project journeys from start to finish – in my business I like to include the initial concept boards, the photo shoot itself, and the final images.
Layering Techniques
One of my go-to techniques involves a layering approach that takes your audience on a journey. Consider outlining the beginning, middle, and end of your process, while also circling back to how your client or customer benefits from the service or product you’re highlighting.
It’s an excellent opportunity to weave in client testimonials or demonstrate how your work enhances their business or life. This additional layer acts like a fourth dimension, emphasizing the transformation your customers experience through your product or service!
Pro Tips Across All Levels
Whether you’re just starting out, building your confidence, or feel like a seasoned pro when it comes to creating visual content for your brand, here are some tips that are helpful across the board:
- Repurpose your content. Once you’ve created a strong piece of content, it’s not a one-time deal. Reshape and reuse it in different formats and platforms. Remember that awesome workspace tour you did before? You can totally do it again! Actually, I encourage recycling content ideas. Sprinkle in similar stuff every quarter or so. It helps people understand what you’re all about. Your audience needs to hear your message multiple times before they will take action. So, mix up the delivery! Try presenting the same message in different ways, but keep that main call to action or message consistent.
- Always have a clear call-to-action. Ensure your audience understands the purpose behind your visuals and what you want them to do next (i.e. learn more, book a call, shop, etc.). Even educational content should encourage your audience to take a next step or explore what you have to offer.
Perfect is overrated. Remember, consistency is key. Don’t stress about perfection at the start. It’s about progress. With time and practice, your content creation will evolve, keeping your audience engaged and your brand shining bright!
Keep The Momentum Going
If you’re looking for more inspiration, guidance, and tech support to level-up your content creation game, be sure to check out this two free resources I’ve built specifically for creative businesses like yours:

Free Guide: Capture Your Content. It’s a comprehensive, brand-photographer approved, 8-page guide to capturing business content consistently so you can build your business on social media.
View comments
+ Leave a comment